Getting Started
This getting started guide will help you deploy your first environment using Terra3. This guide is split across three steps:
Deploying a static website served from an S3 bucket and AWS Cloudfront
Deploying all from step 1 + an nginx demo container on AWS ECS
Deploying all from step 1 & 2 + providing your own domain name and enabling TLS between Cloudfront and the Application Loadbalancer
Prerequisites
First, ensure that you have installed the following tools locally.
Clone the repo
git clone https://github.com/it-objects/terraform-aws-terra3.gitDeployment Steps for Example 1
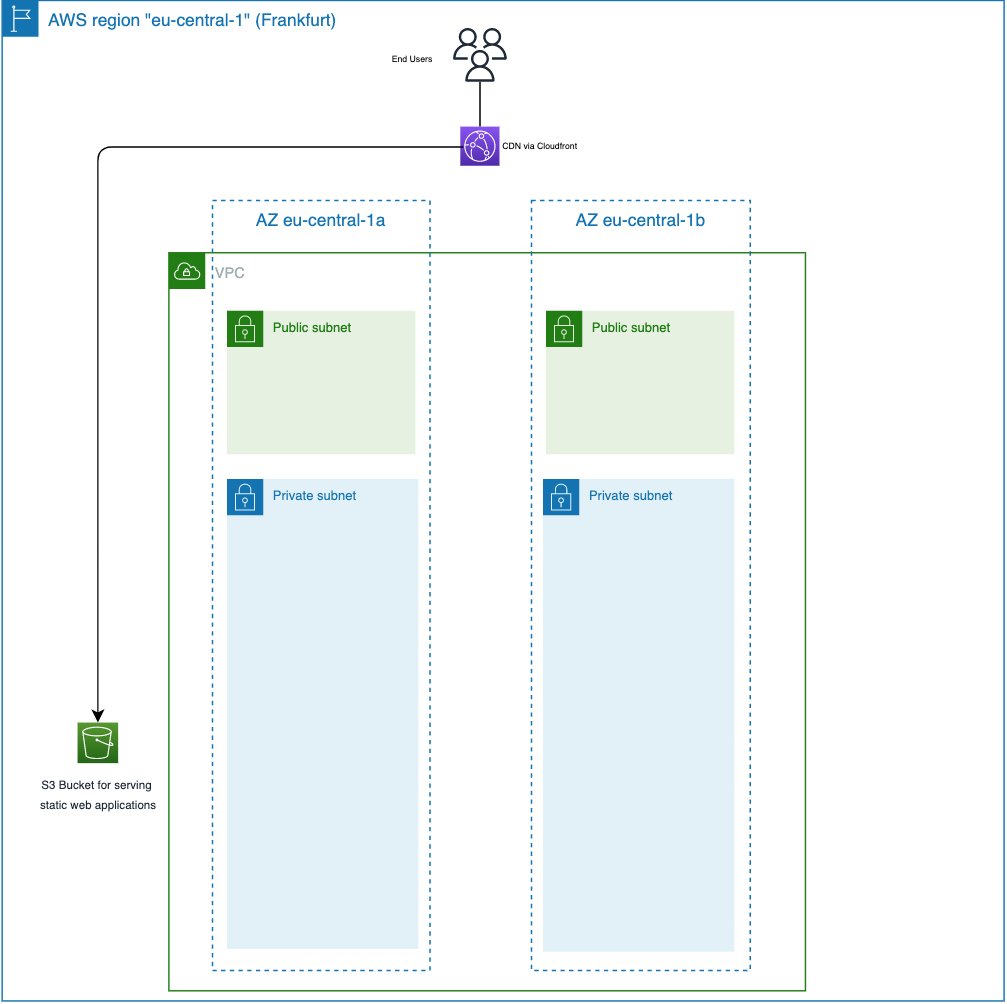
Example 1 will provision a subset of the overall 3-tier architecture, namely
- the static website served from an S3 bucket and AWS Cloudfront
as depicted in this diagram:
Terraform INIT
CD into the examples directory:
cd terraform-aws-terra3/examples/example_1Initialize the working directory with the following:
terraform initTerraform PLAN
Verify the resources that will be created by this execution:
terraform planTerraform APPLY
Let’s provision this example.
Note: make sure that the AWS CLI is correctly configured and that you’re deploying to the right AWS account.
terraform applyValidation
After about 30-60 seconds, the script has been applied and a Cloudfront URL is shown similar to this one:
cloudfront_default_domain_name = "dcot74k2131h8.cloudfront.net"Use it in your browser to test the static website deployed to S3 and served via Cloudfront.
Please note: it requires another 30 seconds, until the Cloudfront distribution is ready and the website is presented correctly.
It could look something like this when you use the command line tool “curl” to query the URL:
❯ curl https://dcot74k2131h8.cloudfront.net
<h1>Hello world, Terra3!</h1>%
Go to the S3 section in your AWS web console and find the S3 bucket with the index.html file. Feel free, to edit the file and see the change being reflected when reloading the page in your browser.
Finalization
To clean up your AWS account, issue the following command which will remove all previously provisioned AWS resources.
terraform destroyDeployment Steps for Example 2
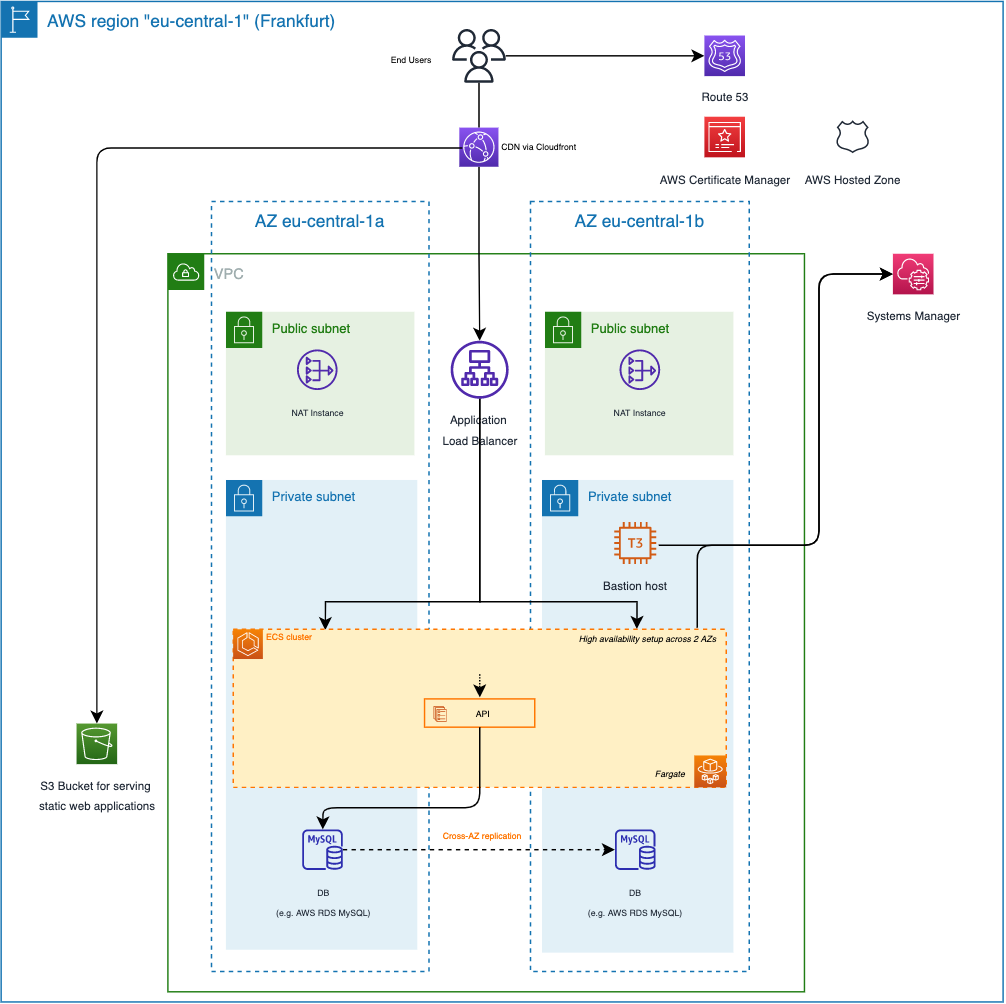
Example 2 will provision a more advanced subset of the overall 3-tier architecture, namely
the static website served from an S3 bucket and AWS Cloudfront and
an ECS task with two containers
as depicted in this diagram:

Terraform INIT
CD into the examples directory:
cd terraform-aws-terra3/examples/example_2Initialize the working directory with the following:
terraform initTerraform PLAN
Verify the resources that will be created by this execution:
terraform planTerraform APPLY
Let’s provision the first example.
Note: make sure that the AWS CLI is correctly configured and that you’re deploying to the right AWS account.
terraform applyValidation
After about 4 minutes, the script has been applied and a Cloudfront URL is shown similar to this one:
cloudfront_default_domain_name = "dcot74k2131h8.cloudfront.net"Use it in your browser to test the static website deployed to S3 and served via Cloudfront. Append “/api/” to the end of the URL to check that traffic is routed correctly to your nginxdemos/hello container via the application load balancer.
Please note: it requires another 30 seconds, until the Cloudfront distribution and the containers are ready and the website is presented correctly.
It could look something like this when you use the command line tool “curl” to query the URL:
❯ curl https://dcot74k2131h8.cloudfront.net
<h1>Hello world, Terra3!</h1>%

❯ curl https://dcot74k2131h8.cloudfront.net/api/
<!DOCTYPE html>
<html>
<head>
<title>Hello World</title>
...
Go to the ECS section in your AWS web console and find the ECS cluster. You should be able to see the task with two containers you just have deployed. The
Finalization
To clean up your AWS account, issue the following command which will remove all previously provisioned AWS resources.
terraform destroyDeployment Steps for Example 3
Example 3 will provision an even more advanced subset of the overall 3-tier architecture, namely
the static website served from an S3 bucket and AWS Cloudfront and
an ECS task with two containers and
your own domain + ACM certificates
as depicted in this diagram:
A subdomain will be created named after the name of your solution (solution_name parameter). Also a second subdomain will be created for your loadbalancer so that we also achieve a transport encryption with TLS between Cloudfront and the Application Loadbalancer.
Please note: there’s a prerequisite to this example. A Route53 Hosted Zone needs to be provisioned into your account already, with a domain attached to it. The ID of the hosted zone is required as input parameter, so that the Terraform script can be executed.
Terraform INIT
CD into the examples directory:
cd terraform-aws-terra3/examples/example_3Initialize the working directory with the following:
terraform initUpdate Route53 Hosted Zone Id
As mentioned in the prerequisite to this example, please open the main.tf file and enter the Route53 hosted zone ID.
locals {
  route53_zone_id = "<PLEASE ENTER HERE THE HOSTED ZONE ID>"
  solution_name   = "terra3-example3"
}
Terraform PLAN
Verify the resources that will be created by this execution:
terraform planTerraform APPLY
Let’s provision the first example.
Note: make sure that the AWS CLI is correctly configured and that you’re deploying to the right AWS account.
terraform applyValidation
After about 6 minutes, the script has been applied and a Cloudfront URL is shown similar to this one:
cloudfront_default_domain_name = "dcot74k2131h8.cloudfront.net"Please note: it requires another 30 seconds, until the Cloudfront distribution is ready and the website is presented correctly.
Use it in your browser to test the static website deployed to S3 and served via Cloudfront. If you have setup a hosted zone correctly with your domain, you should now also be able to use your domain name in your browser following this schema:
<solution_name>.<domain_name given in your hosted zone>, e.g.
terra3-example3.terra3.io where "terra3-example3" is the solution_name and terra3.io the hosted zone domain name.
It could look something like this when you use the command line tool “curl” to query the URL:
❯ curl https://terra3-example3.terra3.io       # use your domain name here, as this example won't work
<h1>Hello world, Terra3!</h1>%

❯ curl https://terra3-example3.terra3.io/api/  # use your domain name here, as this example won't work
<!DOCTYPE html>
<html>
<head>
<title>Hello World</title>
...
Go to the ECS section in your AWS web console and find the ECS cluster. You should be able to see the task with two containers you just have deployed. The
Go to the EC2 section, select the bastion host from the list and click on "Connect". Select the "Session Manager" tab and click connect. Now, you should be able to shell into the EC2 instance in the most secure way. After installing the mysql client, you should also be able to access the RDS MySQL database, as security groups are configured accordingly.
Finalization
To clean up your AWS account, issue the following command which will remove all previously provisioned AWS resources.
terraform destroy